Setting a custom name server on an OpenStack instance

In an OpenStack tenant that is not allowed to create a network with neutron net-create, the name server can be set via cloudinit. The resolv-conf module although documented in the examples is not always available. It can be worked around with

#cloud-config
bootcmd:
 - echo nameserver 4.4.4.4 | tee /etc/resolvconf/resolv.conf.d/head
 - resolvconf -u

for Ubuntu or

#cloud-config
bootcmd:
 - echo nameserver 4.4.4.4 | tee /etc/resolv.conf
 - sed -ie 's/PEERDNS="yes"/PEERDNS="no"/' /etc/sysconfig/network-scripts/ifcfg-eth0

for CentOS.

OpenStack instance name based on its IP address

A DNS has a set of pre-defined names such as:

...
the-re018 10.0.3.18
the-re019 10.0.3.19
...

If nova fixed-ip-reserve is denied by the OpenStack policy and neutron net-create is not available to create a network with the 10.0.3.0/24 subnet that is exclusive to the OpenStack tenant, the naming of the instance must be done after openstack server create completes.
A cloudinit user-data file is created with:

 - url=http://169.254.169.254/2009-04-04/meta-data \
  ( curl --silent $url/hostname | sed -e 's/\..*//' ; \
    printf "%03d" $(curl --silent $url/local-ipv4 | \
       sed -e 's/.*\.\(.*\)/\1/') \
  ) | \
  tee /etc/hostname
- hostname $(cat /etc/hostname)
preserve_hostname: true

Where $url/hostname retrieves the prefix of the hostname (multiple instances can have the same name, two simultaneous instance creation won’t race), $url/local-ipv4 gets the IPv4 address, keeps the last digits (sed -e ‘s/.*\.\(.*\)/\1/’)) and pad them with zeros if necessary (printf “%03d”). The hostname is stored in /etc/hostname and displayed in the /var/log/cloud-init.log logs (tee /etc/hostname) for debugging. This is done early in the cloudinit sequence (bootcmd) and the default cloudinit setting of the hostname is disabled (preserve_hostname: true) so that it does not override the custom name set with hostname $(cat /etc/hostname).
The instance is created with

$ openstack server create \
  --image 'ubuntu-trusty-14.04'
  --key-name loic \
  --flavor m1.small \
  --user-data user-data.txt \
  -f json \
  --wait \
  the-re
... {"Field": "addresses", "Value": "fsf-lan=10.0.3.19"} ...
... {"Field": "id", "Value": "cd1a8a0f-83f9-4266-bd61-f3e2f583d59d"} ...

Whe user-data.txt contains the above cloudinit lines. The IPv4 address returned by openstack server create (10.0.3.19) can then be used to rename the instance with

$ openstack server set --name the-re019 cd1a8a0f-83f9-4266-bd61-f3e2f583d59d

where cd1a8a0f-83f9-4266-bd61-f3e2f583d59d is the unique id of the instance which is preferred to the the-re prefix that could race with another identical openstack server create command.
To verify that the instance name matches the IPv4 address that is pre-set in the DNS:

$ ssh ubuntu@the-re019 hostname
Warning: Permanently added '10.0.3.19' (ECDSA) to the list of known hosts.
the-re019

Thanks to Josh Durgin for suggesting this solution.

Delete the last port of an OpenStack router

When trying to delete an OpenStack subnet and the associated router, the command neutron router-delete complains because of the port allocated for the gateway and the port of the gateway cannot be removed with neutron port-delete because it is owned by the router. The solution is to clear the owner of the port with something like:

neutron port-update --device-owner clear 7f9685cb-794d-4847

and then delete the router. This is on Icehouse as provided by Enter Cloud Suite.

OpenStack script to pre-allocate fixed IPs

The create-ports.py script allocates ports and indirectly gets fixed IPs from the DHCP server. The ports are named openstack000, openstack001 etc. and they are displayed in a format suitable for dnsmasq:

$ python create-ports.py --count 2 --net fsf-lan |  \
   sudo tee /etc/dnsmasq.d/openstack
host-record=openstack000,10.0.3.32
host-record=openstack001,10.0.3.33

If fsf-lan is a network shared with other tenants, it makes sure the IP are reserved, although they are not yet bound to an instance.

$ neutron port-list
+--------------------------------------+--------------+..
| id                                   | name         | ...
+--------------------------------------+--------------+...
| 1d1a05b1-383d-49ef-ae75-5ddcb5c714db | openstack001 |....
...
+--------------------------------------+--------------+...

An new instance can then be given a known IP with:

$ openstack server create --image ubuntu-trusty-14.04 \
  --flavor 1cpu-1G \
  --key-name teuthology \
  --nic net-id=d936f445-5d68-485a-94f2-b852fd6b7d0c,v4-fixed-ip=10.0.3.33 \
  --wait openstack001

In the case of teuthology it is useful because the DNS can be configured once and for all while instances are dynamically created using IPs from the DNS instead of relying on allocation from the OpenStack DHCP server.
Continue reading “OpenStack script to pre-allocate fixed IPs”

create / delete an OpenStack instance with python-openstackclient

The python-openstackclient library has an example that provides the basic structure for a new command (the auth_url problem workaround may be needed). To create a virtual machine with 1GB RAM, 1CPU, ubuntu-14.04, using the teuthology keypair on the fsf-lan network, the matching flavor, image, keypair and network objects can be found with:

    for flavor in client_manager.compute.flavors.list():
        if flavor.ram == 1024 and flavor.vcpus == 1:
            break
    for network in client_manager.compute.networks.list():
        if network.label == 'fsf-lan':
            break
    for image in client_manager.compute.images.list():
        if 'ubuntu' in image.name and '14.04' in image.name:
            break
    for keypair in client_manager.compute.keypairs.list():
        if keypair.name == 'teuthology':
            break

The test instance can then be created

   server = client_manager.compute.servers.create('test',
                        image, flavor,
                        key_name=keypair.name,
                        nics=[{'net-id': network.id}])

but it won’t be immediately active and the wait_for_status can be used to block until it is:

from openstackclient.common import utils
...
    utils.wait_for_status(
        client_manager.compute.servers.get,
        server.id)

Deleting the instance is simpler:

    client_manager.compute.servers.delete(server.id)
    utils.wait_for_delete(client_manager.compute.servers.get, server.id)

See create-delete.py for a standalone script including the above lines that can be run as:

$ python create-server.py --help
usage: create-server.py [-h] [--os-compute-api-version ]
...
$ python create-server.py
FLAVOR: {'name': u'm1.small', ...
NETWORK: {'cidr_v6': None, 'dns2': None, 'dns1': None, 'netmask': None, 'label': u'fsf-lan',...
IMAGE: {'status': u'ACTIVE', 'updated': u'2014-05-19T11:43:00Z', 'name': u'ubuntu-trusty-14.04',...
KEYPAIR: {'public_key': u'ssh-rsa AAAAB3...

Continue reading “create / delete an OpenStack instance with python-openstackclient”

Teuthology docker targets hack (5/5)

The teuthology container hack is improved to run teuthology-suite. For instance:

./virtualenv/bin/teuthology-suite \
  --distro ubuntu \
  --suite-dir $HOME/software/ceph/ceph-qa-suite \
  --config-file docker-integration/teuthology.yaml \
  --machine-type container \
  --owner loic@dachary.org \
  --filter 'rados:basic/{clusters/fixed-2.yaml fs/btrfs.yaml \
     msgr-failures/few.yaml tasks/rados_cls_all.yaml}' \
  --suite rados/basic --ceph ANY \
  $(pwd)/docker-integration/ubuntu.yaml

schedules a single job out of the rados suite and the results can be collected in the teuthology-worker archive directory:

$ tail -5 /tmp/a/loic-2015-06-06_16:06:57-rados:\
    basic-ANY---basic-container/22/teuthology.log
06:57-rados:basic-ANY---basic-container/22/teuthology.log
    tasks/rados_cls_all.yaml}', duration: 1017.5819008350372, \
  flavor: basic, owner: loic@dachary.org,
  success: true}
2015-06-06T16:24:38.634 WARNING:teuthology.report:No result_server \
  in config; not reporting results
2015-06-06T16:24:38.634 INFO:teuthology.run:pass

Continue reading “Teuthology docker targets hack (5/5)”

Ceph Jerasure and ISA plugins benchmarks

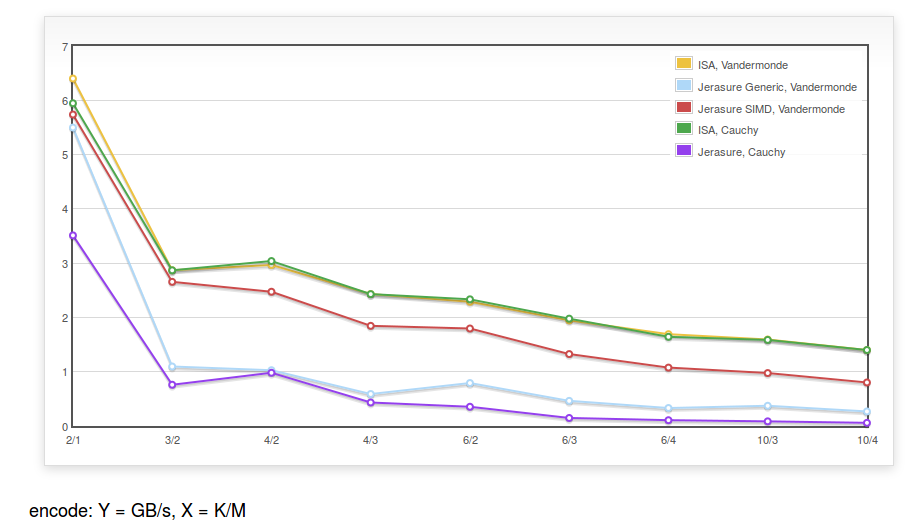
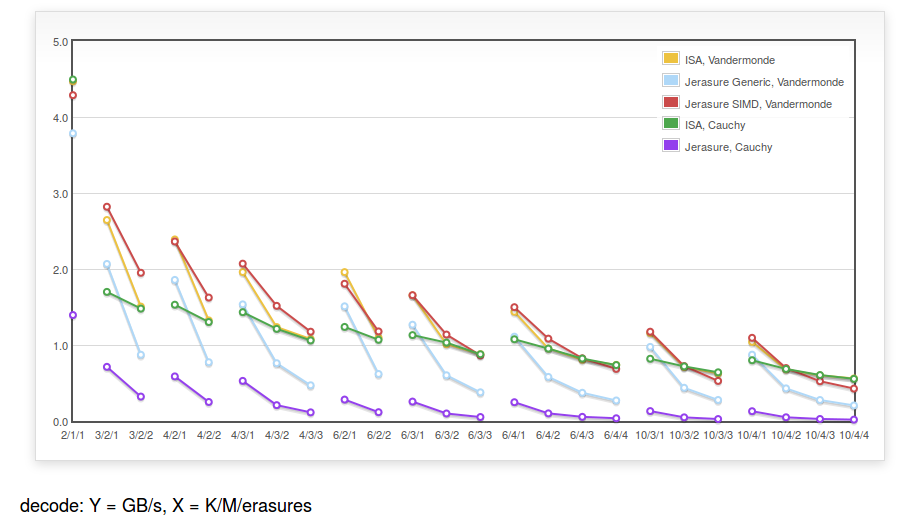
In Ceph, a pool can be configured to use erasure coding instead of replication to save space. When used with Intel processors, the default Jerasure plugin that computes erasure code can be replaced by the ISA plugin for better write performances. Here is how they compare on a Intel(R) Xeon(R) CPU E3-1245 V2 @ 3.40GHz.

Encoding and decoding all used 4KB objects which is the default stripe width. Two variants of the jerasure plugins were used: Generic (jerasure_generic) and SIMD (erasure_sse4) which is used when running on an Intel processor with SIMD instructions.
This benchmark was run after compiling from sources using

$ ( cd src ; make ceph_erasure_code_benchmark )
$ TOTAL_SIZE=$((4 * 1024 * 1024 * 1024)) \
CEPH_ERASURE_CODE_BENCHMARK=src/ceph_erasure_code_benchmark \
PLUGIN_DIRECTORY=src/.libs \
  qa/workunits/erasure-code/bench.sh fplot | \
  tee qa/workunits/erasure-code/bench.js

and displayed with

firefox qa/workunits/erasure-code/bench.html

Improving Ceph python scripts tests

The Ceph command line and ceph-disk helper are python scripts for which there are integration tests (ceph-disk.sh and test.sh). It would be useful to add unit tests and pep8 checks.
It can be done by creating a python module instead of an isolated file (see for instance ceph-detect-init) with a tox.ini file including pep8, python2 and python3 test environments.
Since Ceph relies on autotools, the setup.py can be used with -local targets. For instance:

all-local::
        python setup.py build
clean-local::
	python setup.py clean
install-data-local::
	python setup.py install --root=$(DESTDIR) --install-layout=deb

Note the double : meaning it appends to an existing rule instead of overriding it. The –root=$(DESTDIR) will install the module files in the appropriate directory when building packages.
tox uses pip to fetch dependencies required to run tests from PyPI, but tests sometime run without network access. The depedencies can be collected by wheel with something like:

pip wheel -r requirements.txt

It will create a wheelhouse directory which can later be used with

pip install --no-index --use-wheel --find-links=wheelhouse \
  -r requirements.txt

Continue reading “Improving Ceph python scripts tests”

Testing if a jenkins container finished booting

When running Jenkins as a docker container for test purposes, it is necessary to verify the Jenkins master is fully functional before running the first test cases.
The http interface can be tested with a call to the API such as

curl --silent http://jenkins.host/api/json

It will first fail with Connection reset by peer, then with 503 Server Error: Service Unavailable and return a JSON output after a few seconds.
The Jenkins CLI can be tested by sending the help command.

$ wget -O /tmp/jenkins-cli.jar http://jenkins.host/jnlpJars/jenkins-cli.jar
$ java -jar /tmp/jenkins-cli.jar -s http://jenkins.host help

and it will use port 50000 to connect to the jenkins master. It will first fail with an error such as

SEVERE: I/O error in channel Chunked connection to http://jenkins.host/cli
java.io.StreamCorruptedException: invalid stream header: 0A0A0A0A

meaning the connection to port 50000 failed (the error message is misleading).
It will eventually succeed with

   add-job-to-view
    Adds jobs to view.
  build
...

If security is disabled (which is the default when running the container), a call to the CLI will succeed despite the following error message.

SEVERE: I/O error in channel CLI connection to http://jenkins.host
java.io.IOException: Unexpected termination of the channel

DNS spoofing with RPZ and bind9

When two web services reside on the same LAN, it may be convenient to spoof DNS entries to use the LAN IP instead of the public IP. It can be done using RPZ and bind9.
For instance workbench.dachary.org can be mapped to 10.0.2.21 with

$ cat /etc/bind/rpz.db
$TTL 60
@            IN    SOA  localhost. root.localhost.  (
                          2   ; serial
                          3H  ; refresh
                          1H  ; retry
                          1W  ; expiry
                          1H) ; minimum
                  IN    NS    localhost.

workbench.dachary.org        A    10.0.2.21

The zone is declared in

$ cat /etc/bind/named.conf.local
zone "rpz" {
      type master;
      file "/etc/bind/rpz.db";
      allow-query {none;};
};

and the response-policy is set in the options file with

$ cat /etc/bind/named.conf.options
...
	response-policy { zone "rpz"; };
};

When bind9 is restarted with /etc/init.d/bind9 restart, the mapping can be verified with

$ dig @127.0.0.1 workbench.dachary.org
workbench.dachary.org.	5	IN	A	10.0.2.21

If the bind9 server runs on a docker host, it can be used by docker containers with

docker run  ... --dns=172.17.42.1 ...