Shrink an OpenStack image

After a while openstack image create creates increasingly large files because the blocks used and freed are not trimmed and it is not uncommon for hypervisors to not support fstrim. The image can be shrinked and the virtual machine recreated from it to reclaim the unused space.

$ openstack image save --file 2017-06-16-gitlab.qcow2 2017-06-16-gitlab
$ qemu-img convert 2017-06-16-gitlab.qcow2 -O raw work.img
$ sudo kpartx -av work.img
add map loop0p1 (252:0): 0 104855519 linear 7:0 2048
$ sudo e2fsck -f /dev/mapper/loop0p1
...
cloudimg-rootfs: 525796/6400000 files (0.1% non-contiguous), 2967491/13106939 blocks
$ sudo resize2fs -p -M /dev/mapper/loop0p1
...
The filesystem on /dev/mapper/loop0p1 is now 3190624 (4k) blocks long.
$ sudo kpartx -d work.img
loop deleted : /dev/loop0

Create a smaller image that is big enough for the resized file system.

$ sudo virt-df -h work.img
Filesystem                                Size       Used  Available  Use%
work.img:/dev/sda1                         12G       9.7G       2.0G   83%
$ qemu-img create -f raw smaller.img 13G
Formatting 'smaller.img', fmt=raw size=13958643712

Resize the large image into the smaller one:

$ sudo virt-resize --shrink /dev/sda1 work.img smaller.img
...
Resize operation completed with no errors.  Before deleting the old disk,
carefully check that the resized disk boots and works correctly.
$ ls -lh work.img smaller.img
-rw-r--r-- 1 ubuntu ubuntu 13G Jun 16 08:38 smaller.img
-rw-r--r-- 1 ubuntu ubuntu 50G Jun 16 08:31 work.img
$ qemu-img convert smaller.img -O qcow2 smaller.qcow2

Upload the smaller image

time openstack image create --file smaller.qcow2 \
     --disk-format=qcow2 --container-format=bare 2017-06-16-gitlab-smaller

Testing Ceph with ARMv8 OpenStack instances

The Ceph integration tests can be run on ARMv8 (aka arm64 or aarch64) OpenStack instances on CloudLab or Runabove.

When logged in CloudLab an OpenStack cluster suitable for teuthology must be created. To start an experiment

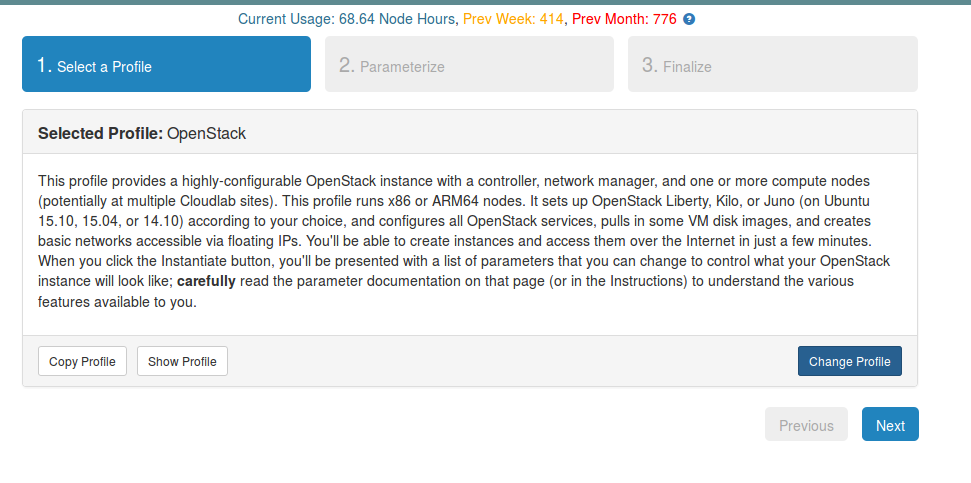
click Change Profile

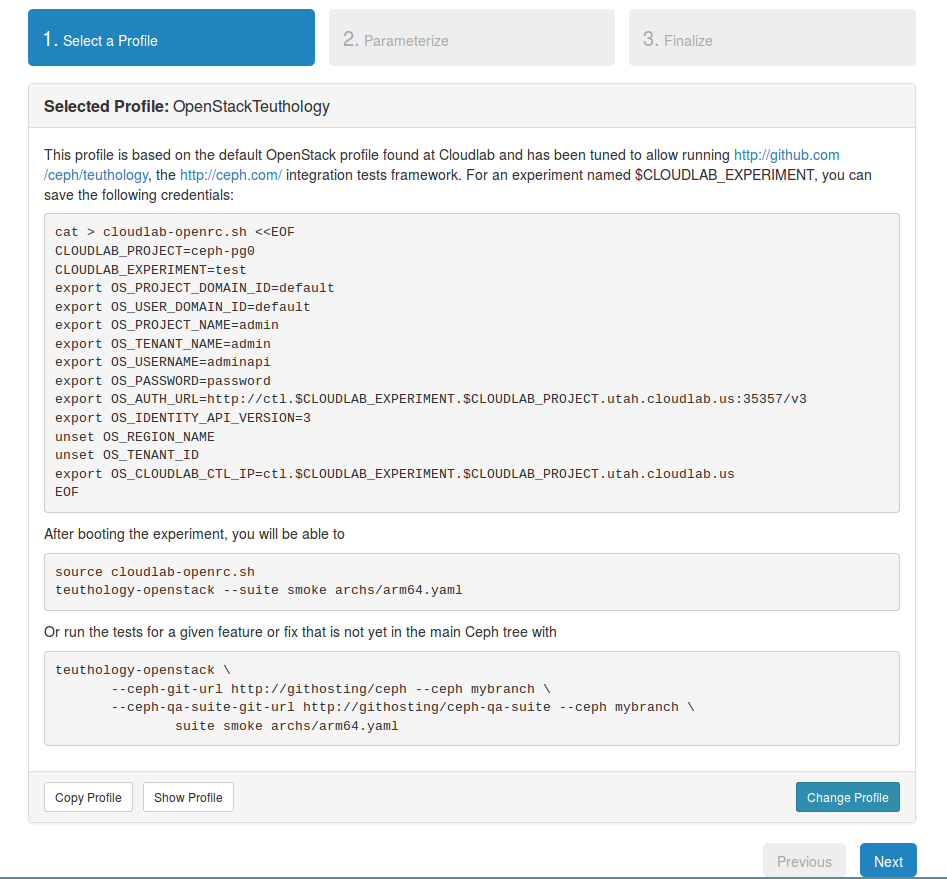
to select the OpenStackTeuthology profile

the description of the profile contains an example credential file (i.e. openrc.sh) that can be copy/pasted on the local machine

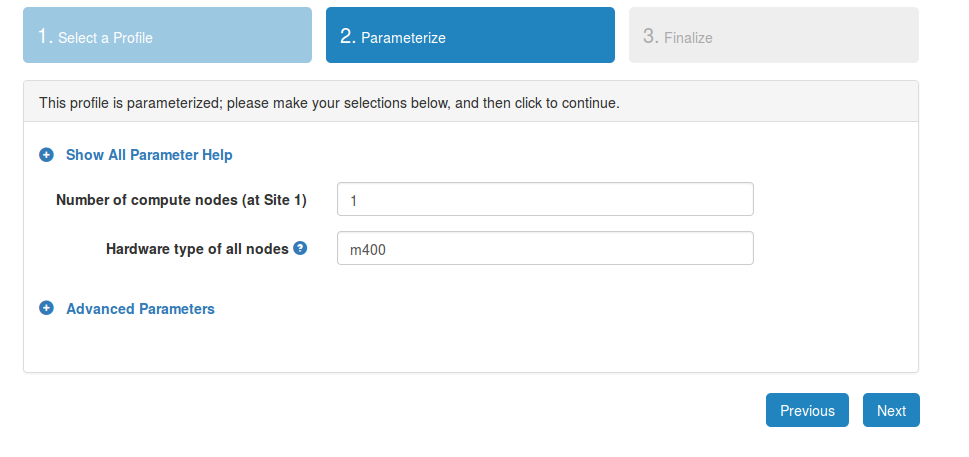
the m400 default machine type will select ARMv8 hardware

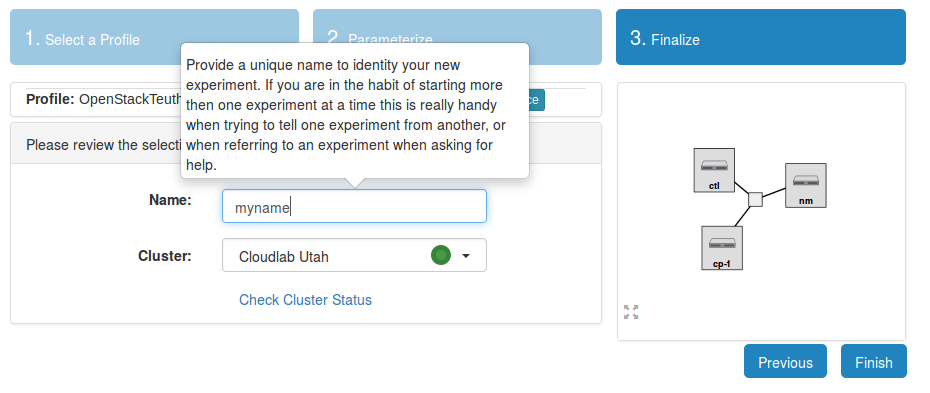
in the last step, choose a name for the experiment. The openrc.sh file must be modified to reflect the chosen name because it shows in the URL of the authentication service. If a new experiment by the same name is run a month later, the same openrc.sh file can be used.

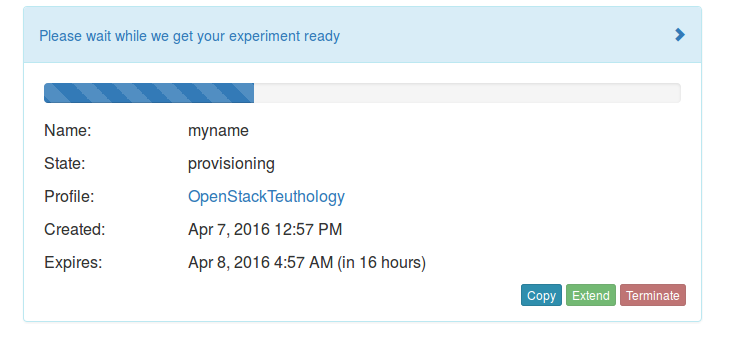
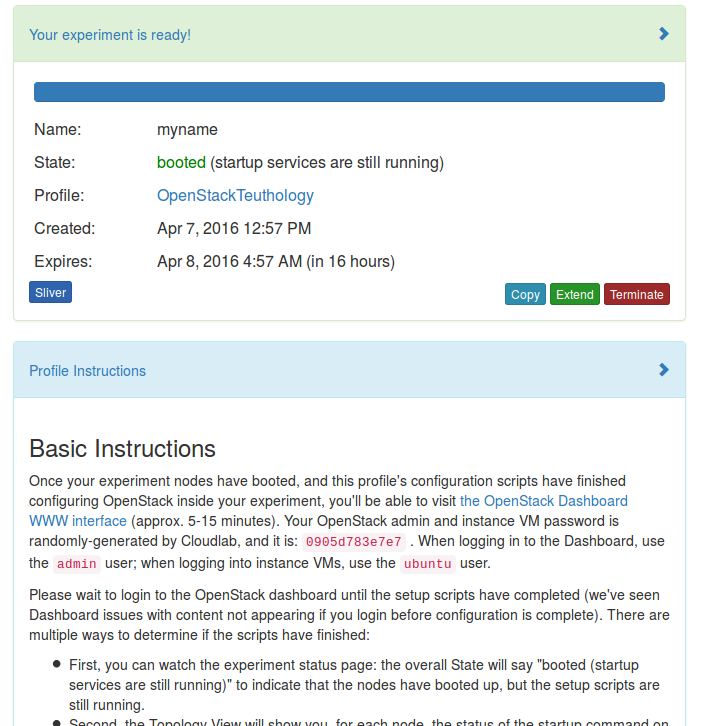
the page is then updated to show the progress of the provisionning. Note that it takes about 15 minutes for it to complete: even when the page says the experiment is up, the OpenStack setup is still going on and need a few more minutes.

Finally click on Profile instructions to display the link to the horizon dashboard and the password of the admin user (i.e. configuring OpenStack inside your experiment, you’ll be able to visit the OpenStack Dashboard WWW interface (approx. 5-15 minutes). Your OpenStack admin and instance VM password is randomly-generated by Cloudlab, and it is: 0905d783e7e7 .).

When the cluster is created, running the smoke integration tests for rados on jewel can be done with ceph-workbench

ceph-workbench --verbose ceph-qa-suite --ceph jewel --suite smoke --filter rados

assuming the openrc.sh file has been set in ~/.ceph-workbench/openrc.sh. When the command returns, it displays the URL of the web interface

...
2016-04-07 11:25:57,625.625 DEBUG:paramiko.transport:EOF in transport thread
2016-04-07 11:25:57,628.628 INFO:teuthology.openstack:
pulpito web interface: http://128.110.155.162:8081/
ssh access           : ssh ubuntu@128.110.155.162 # logs in /usr/share/nginx/html

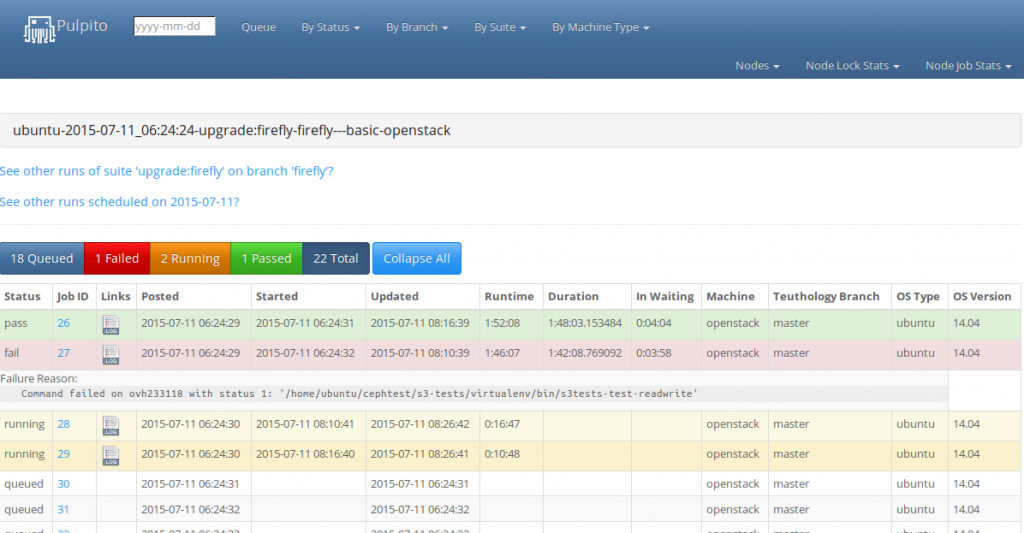
And when the test completes successfully it will show in green. Otherwise the logs of the failed tests can be downloaded and analyzed.

Continue reading “Testing Ceph with ARMv8 OpenStack instances”

Ceph integration tests made simple with OpenStack

If an OpenStack tenant (account in the OpenStack parlance) is available, the Ceph integration tests can be run with the teuthology-openstack command , which will create the necessary virtual machines automatically (see the detailed instructions to get started). To do its work, it uses the teuthology OpenStack backend behind the scenes so the user does not need to know about it.
The teuthology-openstack command has the same options as teuthology-suite and can be run as follows:

$ teuthology-openstack \
  --simultaneous-jobs 70 --key-name myself \
  --subset 10/18 --suite rados \
  --suite-branch next --ceph next
...
Scheduling rados/thrash/{0-size-min-size-overrides/...
Suite rados in suites/rados scheduled 248 jobs.

web interface: http://167.114.242.148:8081/
ssh access   : ssh ubuntu@167.114.242.148 # logs in /usr/share/nginx/html

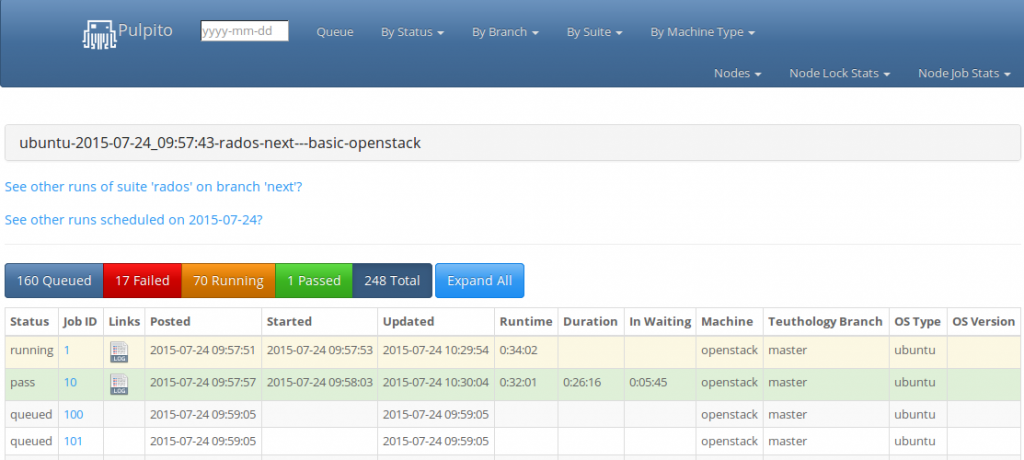
As the suite progresses, its status can be monitored by visiting the web interface::

And the horizon OpenStack dashboard shows resource usage for the run:


Continue reading “Ceph integration tests made simple with OpenStack”

restoring an OpenStack ssh public key

When a ssh private key is obtained from OpenStack via

openstack keypair create foobar > foobar.pem

the matching public key is stored in the OpenStack tenant. If it is later deleted with

openstack keypair delete foobar

it can be restored with

ssh-keygen -y  -f foobar.pem > foobar.pub
openstack keypair create --public-key foobar.pub foobar

oneliner to deploy teuthology on OpenStack

Note: this is obsoleted by Ceph integration tests made simple with OpenStack

The teuthology can be installed as a dedicated OpenStack instance on OVH using the OpenStack backend with:

nova boot \
   --image 'Ubuntu 14.04' \
   --flavor 'vps-ssd-1' \
   --key-name loic \
   --user-data <(curl --silent \
     https://raw.githubusercontent.com/dachary/teuthology/wip-6502-openstack/openstack-user-data.txt | \
     sed -e "s|OPENRC|$(env | grep OS_ | tr '\n' ' ')|") teuthology

Assuming the IP assigned to the instance is 167.114.235.222, the following will display the progress of the integration tests that are run immediately after the instance is created:

ssh ubuntu@167.114.235.222 tail -n 2000000 -f /tmp/init.out

If all goes well, it will complete with:

...
========================= 8 passed in 1845.59 seconds =============
___________________________________ summary _________________________
  openstack-integration: commands succeeded
  congratulations :)

And the pulpito dashboard will display the remains of the integration tests at 167.114.235.222:8081 like so:

Running your own Ceph integration tests with OpenStack

Note: this is obsoleted by Ceph integration tests made simple with OpenStack

The Ceph lab has hundreds of machines continuously running integration and upgrade tests. For instance, when a pull request modifies the Ceph core, it goes through a run of the rados suite before being merged into master. The Ceph lab has between 100 to 3000 jobs in its queue at all times and it is convenient to be able to run integration tests on an independent infrastructure to:

  • run a failed job and verify a patch fixes it
  • run a full suite prior to submitting a complex modification
  • verify the upgrade path from a given Ceph version to another
  • etc.

If an OpenStack account is not available (a tenant in the OpenStack parlance), it is possible to rent one (it takes a few minutes). For instance, OVH provides an horizon dashboard showing how many instances are being used to run integration tests:

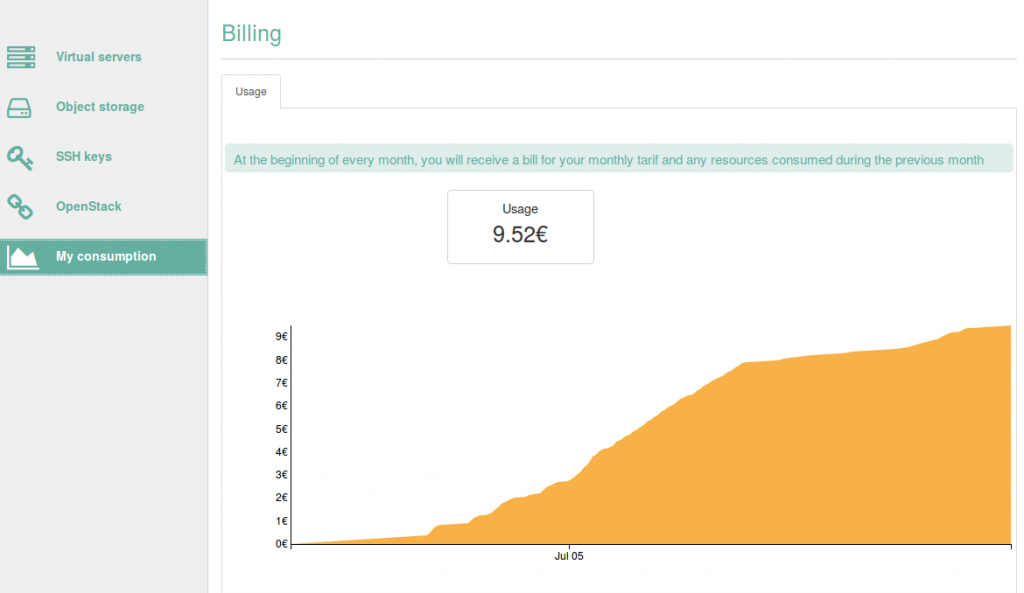
The OpenStack usage is billed monthly and the accumulated costs are displayed on the customer dashboard:


Continue reading “Running your own Ceph integration tests with OpenStack”

Public OpenStack providers usable within the hour

The OpenStack marketplace provides a list of OpenStack public clouds, a few of which enable the user to launch an instance at most one hour after registration.

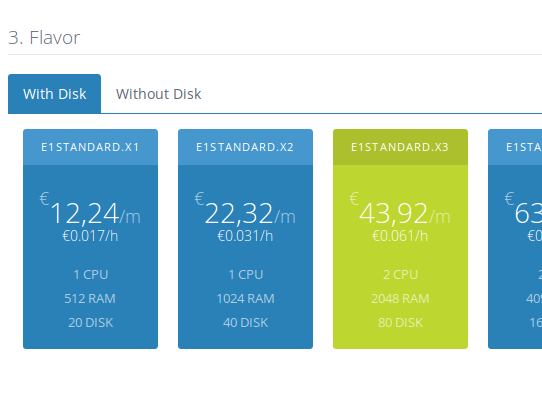
Enter Cloud Suite has a 2GB RAM, 2 CPU, 40GB Disk instance for 0.06 euros / hour (~40 euros per month) and there is no plan to provide a flavor with only 1 CPU instead of 2 CPU. The nova, cinder and neutron API are available.

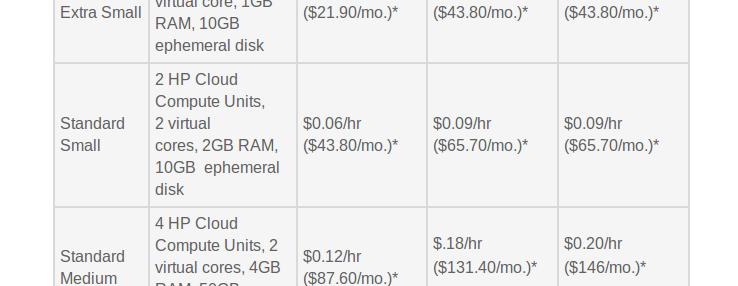
HP Helion Public Cloud has a 2GB RAM, 2 CPU, 10GB Disk instance for 0.05 euros / hour (0.06 USD / hour) (~40 euros per month).

OVH has a 2GB RAM, 1 CPU, 10GB Disk instance for 0.008 euros / hour (~3 euros per month). The nova API is available, not cinder nor neutron.

Rackspace has a 2GB RAM, 1 CPU, 10GB DIsk instance for ~40 euros per month (plus ~50 euros / month service fee, regardless of the number of instances). The nova and cinder API are available, not neutron.

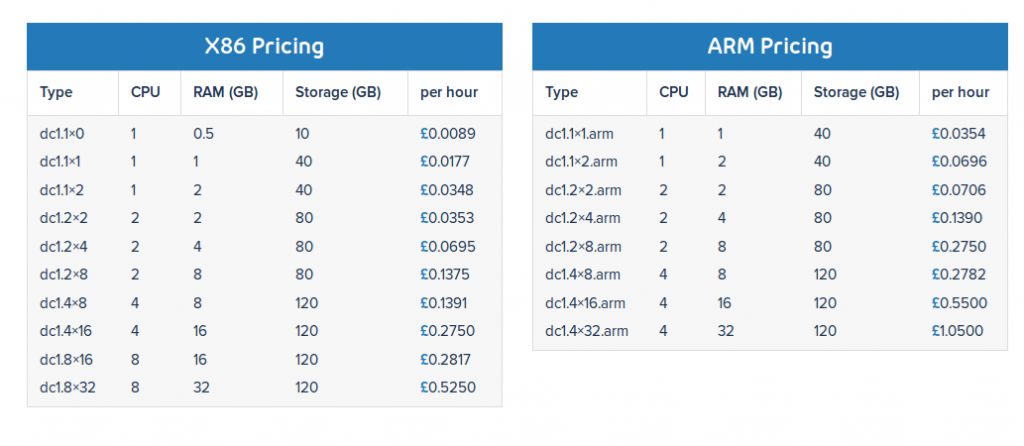
DataCentred has 2GB RAM, 1CPU, 40GB Disk instance for ~40 euros per month. The nova, cinder and neutron API are available (but the router quota are set to zero by default). There are 2GB RAM, 1CPU, 40GB Disk AARCH64 instances for ~80 euros per month.

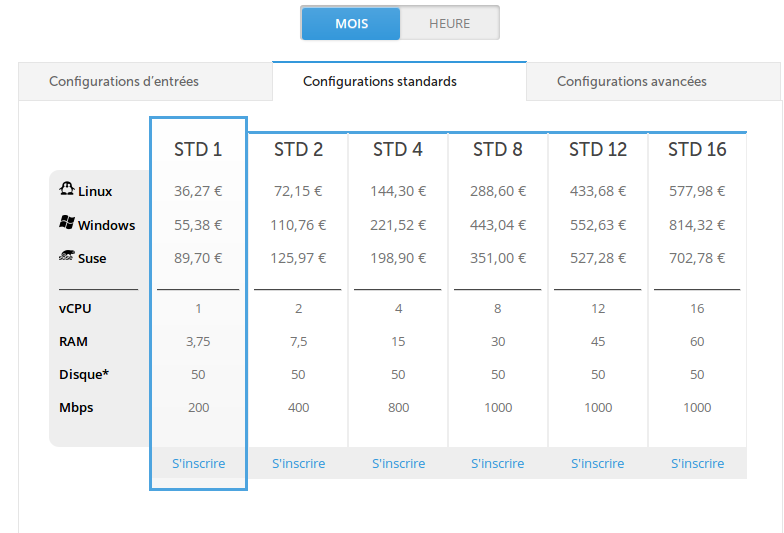
Cloudwatt has no 2GB RAM instance but a 3.75GB RAM, 1CPU, 50GB Disk instance for ~35 euros per month which makes it less expensive than all but OVH. The nova, cinder and neutron API are available.

Setting a custom name server on an OpenStack instance

In an OpenStack tenant that is not allowed to create a network with neutron net-create, the name server can be set via cloudinit. The resolv-conf module although documented in the examples is not always available. It can be worked around with

#cloud-config
bootcmd:
 - echo nameserver 4.4.4.4 | tee /etc/resolvconf/resolv.conf.d/head
 - resolvconf -u

for Ubuntu or

#cloud-config
bootcmd:
 - echo nameserver 4.4.4.4 | tee /etc/resolv.conf
 - sed -ie 's/PEERDNS="yes"/PEERDNS="no"/' /etc/sysconfig/network-scripts/ifcfg-eth0

for CentOS.

OpenStack instance name based on its IP address

A DNS has a set of pre-defined names such as:

...
the-re018 10.0.3.18
the-re019 10.0.3.19
...

If nova fixed-ip-reserve is denied by the OpenStack policy and neutron net-create is not available to create a network with the 10.0.3.0/24 subnet that is exclusive to the OpenStack tenant, the naming of the instance must be done after openstack server create completes.
A cloudinit user-data file is created with:

 - url=http://169.254.169.254/2009-04-04/meta-data \
  ( curl --silent $url/hostname | sed -e 's/\..*//' ; \
    printf "%03d" $(curl --silent $url/local-ipv4 | \
       sed -e 's/.*\.\(.*\)/\1/') \
  ) | \
  tee /etc/hostname
- hostname $(cat /etc/hostname)
preserve_hostname: true

Where $url/hostname retrieves the prefix of the hostname (multiple instances can have the same name, two simultaneous instance creation won’t race), $url/local-ipv4 gets the IPv4 address, keeps the last digits (sed -e ‘s/.*\.\(.*\)/\1/’)) and pad them with zeros if necessary (printf “%03d”). The hostname is stored in /etc/hostname and displayed in the /var/log/cloud-init.log logs (tee /etc/hostname) for debugging. This is done early in the cloudinit sequence (bootcmd) and the default cloudinit setting of the hostname is disabled (preserve_hostname: true) so that it does not override the custom name set with hostname $(cat /etc/hostname).
The instance is created with

$ openstack server create \
  --image 'ubuntu-trusty-14.04'
  --key-name loic \
  --flavor m1.small \
  --user-data user-data.txt \
  -f json \
  --wait \
  the-re
... {"Field": "addresses", "Value": "fsf-lan=10.0.3.19"} ...
... {"Field": "id", "Value": "cd1a8a0f-83f9-4266-bd61-f3e2f583d59d"} ...

Whe user-data.txt contains the above cloudinit lines. The IPv4 address returned by openstack server create (10.0.3.19) can then be used to rename the instance with

$ openstack server set --name the-re019 cd1a8a0f-83f9-4266-bd61-f3e2f583d59d

where cd1a8a0f-83f9-4266-bd61-f3e2f583d59d is the unique id of the instance which is preferred to the the-re prefix that could race with another identical openstack server create command.
To verify that the instance name matches the IPv4 address that is pre-set in the DNS:

$ ssh ubuntu@the-re019 hostname
Warning: Permanently added '10.0.3.19' (ECDSA) to the list of known hosts.
the-re019

Thanks to Josh Durgin for suggesting this solution.

Delete the last port of an OpenStack router

When trying to delete an OpenStack subnet and the associated router, the command neutron router-delete complains because of the port allocated for the gateway and the port of the gateway cannot be removed with neutron port-delete because it is owned by the router. The solution is to clear the owner of the port with something like:

neutron port-update --device-owner clear 7f9685cb-794d-4847

and then delete the router. This is on Icehouse as provided by Enter Cloud Suite.